Implementation Guide
Airbyte Self-Managed Enterprise is in an early access stage for select priority users. Once you are qualified for a Self-Managed Enterprise license key, you can deploy Airbyte with the following instructions.
Airbyte Self-Managed Enterprise must be deployed using Kubernetes. This is to enable Airbyte's best performance and scale. The core components (api server, scheduler, etc) run as deployments while the scheduler launches connector-related pods on different nodes.
Prerequisites
Infrastructure Prerequisites
For a production-ready deployment of Self-Managed Enterprise, various infrastructure components are required. We recommend deploying to Amazon EKS or Google Kubernetes Engine. The following diagram illustrates a typical Airbyte deployment running on AWS:
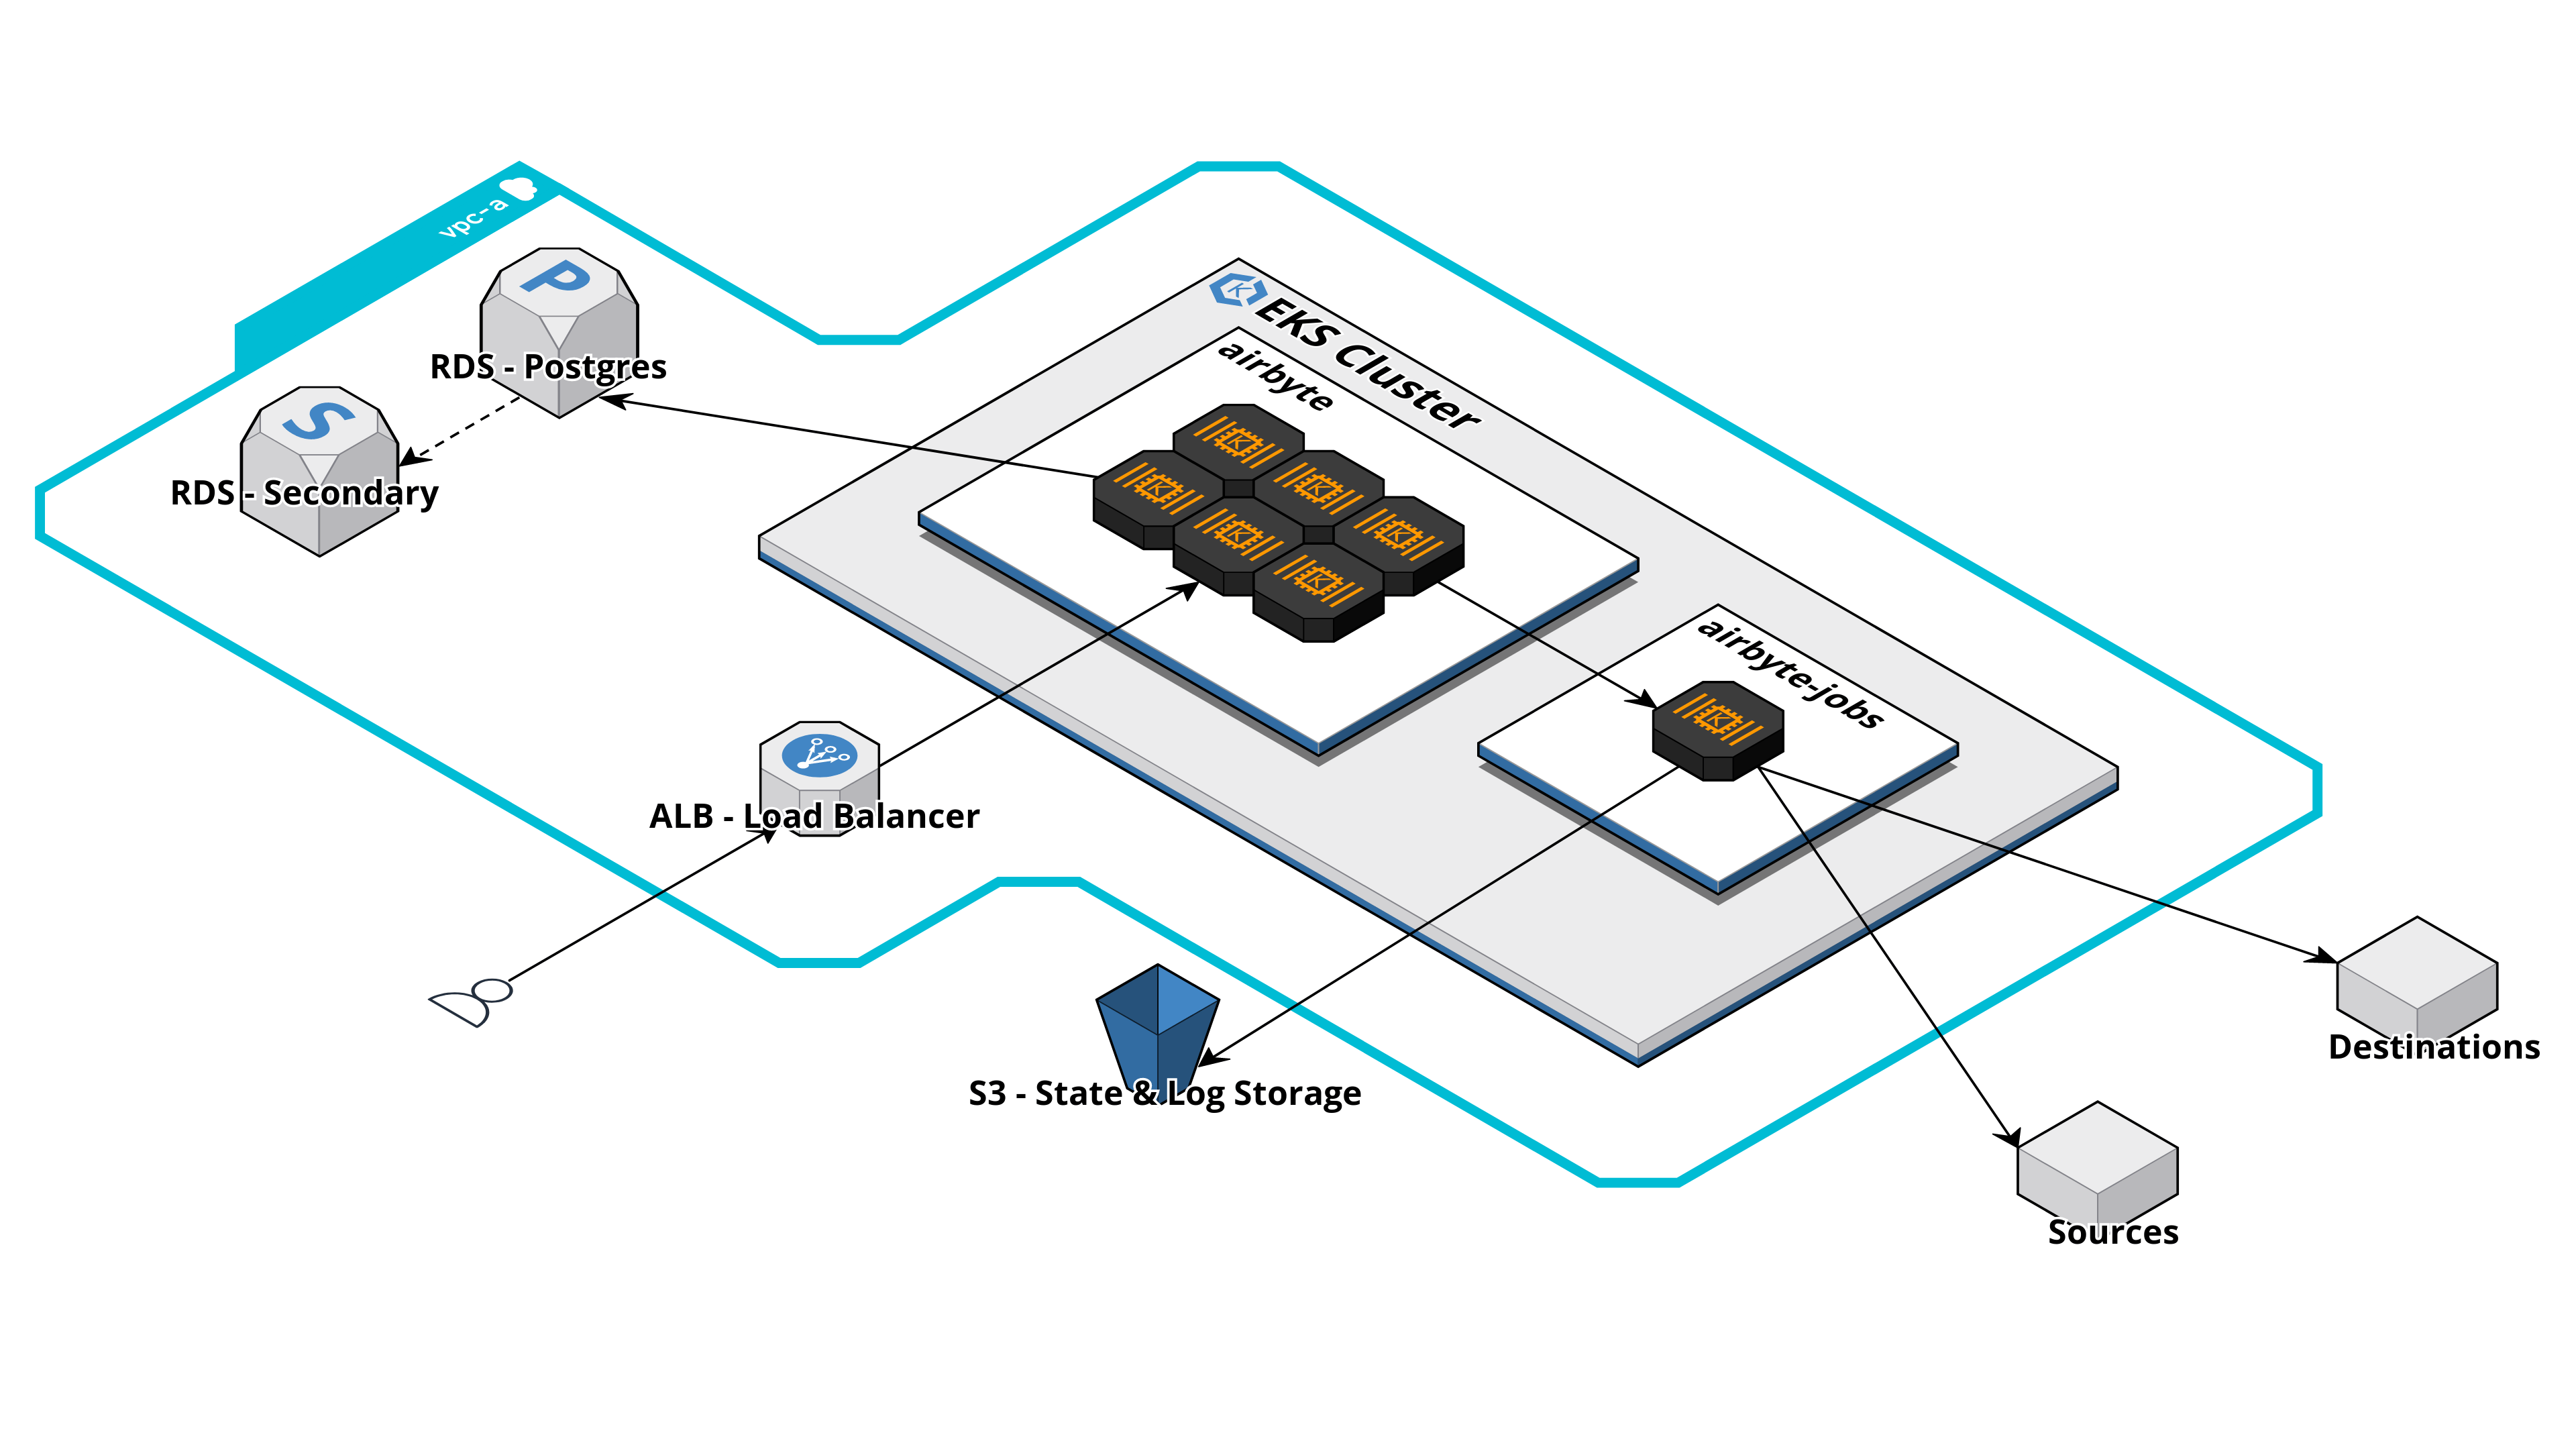
Prior to deploying Self-Managed Enterprise, we recommend having each of the following infrastructure components ready to go. When possible, it's easiest to have all components running in the same VPC. The provided recommendations are for customers deploying to AWS:
| Component | Recommendation |
|---|---|
| Kubernetes Cluster | Amazon EKS cluster running in 2 or more availability zones on a minimum of 6 nodes. |
| Ingress | Amazon ALB and a URL for users to access the Airbyte UI or make API requests. |
| Object Storage | Amazon S3 bucket with two directories for log and state storage. |
| Dedicated Database | Amazon RDS Postgres with at least one read replica. |
| External Secrets Manager | Amazon Secrets Manager for storing connector secrets. |
We require you to install and configure the following Kubernetes tooling:
- Install
helmby following these instructions - Install
kubectlby following these instructions. - Configure
kubectlto connect to your cluster by usingkubectl use-context my-cluster-name:
Configure kubectl to connect to your cluster
- Amazon EKS
- GKE
- Configure your AWS CLI to connect to your project.
- Install eksctl.
- Run
eksctl utils write-kubeconfig --cluster=$CLUSTER_NAMEto make the context available to kubectl. - Use
kubectl config get-contextsto show the available contexts. - Run
kubectl config use-context $EKS_CONTEXTto access the cluster with kubectl.
- Configure
gcloudwithgcloud auth login. - On the Google Cloud Console, the cluster page will have a "Connect" button, with a command to run locally:
gcloud container clusters get-credentials $CLUSTER_NAME --zone $ZONE_NAME --project $PROJECT_NAME. - Use
kubectl config get-contextsto show the available contexts. - Run
kubectl config use-context $EKS_CONTEXTto access the cluster with kubectl.
We also require you to create a Kubernetes namespace for your Airbyte deployment:
kubectl create namespace airbyte
Configure Kubernetes Secrets
Sensitive credentials such as AWS access keys are required to be made available in Kubernetes Secrets during deployment. The Kubernetes secret store and secret keys are referenced in your values.yaml file. Ensure all required secrets are configured before deploying Airbyte Self-Managed Enterprise.
You may apply your Kubernetes secrets by applying the example manifests below to your cluster, or using kubectl directly. If your Kubernetes cluster already has permissions to make requests to an external entity via an instance profile, credentials are not required. For example, if your Amazon EKS cluster has been assigned a sufficient AWS IAM role to make requests to AWS S3, you do not need to specify access keys.
Creating a Kubernetes Secret
While you can set the name of the secret to whatever you prefer, you will need to set that name in various places in your values.yaml file. For this reason we suggest that you keep the name of airbyte-config-secrets unless you have a reason to change it.
airbyte-config-secrets
- S3
- GCS
apiVersion: v1
kind: Secret
metadata:
  name: airbyte-config-secrets
type: Opaque
stringData:
  # Enterprise License Key
  license-key: ## e.g. xxxxx.yyyyy.zzzzz

  # Database Secrets
  database-host: ## e.g. database.internla
  database-port: ## e.g. 5432
  database-name: ## e.g. airbyte
  database-user: ## e.g. airbyte
  database-password: ## e.g. password

  # Instance Admin
  instance-admin-email: ## e.g. admin@company.example
  instance-admin-password: ## e.g. password

  # SSO OIDC Credentials
  client-id: ## e.g. e83bbc57-1991-417f-8203-3affb47636cf
  client-secret: ## e.g. wJalrXUtnFEMI/K7MDENG/bPxRfiCYEXAMPLEKEY

  # AWS S3 Secrets
  s3-access-key-id: ## e.g. AKIAIOSFODNN7EXAMPLE
  s3-secret-access-key: ## e.g. wJalrXUtnFEMI/K7MDENG/bPxRfiCYEXAMPLEKEY

  # AWS Secret Manager
  aws-secret-manager-access-key-id: ## e.g. AKIAIOSFODNN7EXAMPLE
  aws-secret-manager-secret-access-key: ## e.g. wJalrXUtnFEMI/K7MDENG/bPxRfiCYEXAMPLEKEY
You can also use kubectl to create the secret directly from the CLI:
kubectl create secret generic airbyte-config-secrets \
  --from-literal=license-key='' \
  --from-literal=database-host='' \
  --from-literal=database-port='' \
  --from-literal=database-name='' \
  --from-literal=database-user='' \
  --from-literal=database-password='' \
  --from-literal=instance-admin-email='' \
  --from-literal=instance-admin-password='' \
  --from-literal=s3-access-key-id='' \
  --from-literal=s3-secret-access-key='' \
  --from-literal=aws-secret-manager-access-key-id='' \
  --from-literal=aws-secret-manager-secret-access-key='' \
  --namespace airbyte
First, create a new file gcp.json containing the credentials JSON blob for the service account you are looking to assume.
apiVersion: v1
kind: Secret
metadata:
  name: airbyte-config-secrets
type: Opaque
stringData:
  # Enterprise License Key
  license-key: ## e.g. xxxxx.yyyyy.zzzzz

  # Database Secrets
  database-host: ## e.g. database.internla
  database-port: ## e.g. 5432
  database-name: ## e.g. airbyte
  database-user: ## e.g. airbyte
  database-password: ## e.g. password

  # Instance Admin Credentials
  instance-admin-email: ## e.g. admin@company.example
  instance-admin-password: ## e.g. password

  # SSO OIDC Credentials
  client-id: ## e.g. e83bbc57-1991-417f-8203-3affb47636cf
  client-secret: ## e.g. wJalrXUtnFEMI/K7MDENG/bPxRfiCYEXAMPLEKEY

  # GCP Secrets
  gcp.json: <CREDENTIALS_JSON_BLOB>
Using kubectl to create the secret directly from the gcp.json file:
kubectl create secret generic airbyte-config-secrets \
  --from-literal=license-key='' \
  --from-literal=database-host='' \
  --from-literal=database-port='' \
  --from-literal=database-name='' \
  --from-literal=database-user='' \
  --from-literal=database-password='' \
  --from-literal=instance-admin-email='' \
  --from-literal=instance-admin-password='' \
  --from-file=gcp.json
  --namespace airbyte
Installation Steps
Step 1: Add Airbyte Helm Repository
Follow these instructions to add the Airbyte helm repository:
- Run
helm repo add airbyte https://airbytehq.github.io/helm-charts, whereairbyteis the name of the repository that will be indexed locally. - Perform the repo indexing process, and ensure your helm repository is up-to-date by running
helm repo update. - You can then browse all charts uploaded to your repository by running
helm search repo airbyte.
Step 2: Configure your Deployment
-
Inside your
airbytedirectory, create an emptyvalues.yamlfile. -
Paste the following into your newly created
values.yamlfile. This is required to deploy Airbyte Self-Managed Enterprise:
global:
  edition: enterprise
- To enable SSO authentication, add instance admin details SSO auth details to your
values.yamlfile, underglobal. See the following guide on how to collect this information for various IDPs, such as Okta and Azure Entra ID.
auth:
  instanceAdmin:
    firstName: ## First name of admin user.
    lastName: ## Last name of admin user.
  identityProvider:
    type: oidc
    secretName: airbyte-config-secrets ## Name of your Kubernetes secret.
    oidc:
      domain: ## e.g. company.example
      app-name: ## e.g. airbyte
      clientIdSecretKey: client-id
      clientSecretSecretKey: client-secret
- You must configure the public facing URL of your Airbyte instance to your
values.yamlfile, underglobal:
airbyteUrl: # e.g. https://airbyte.company.example
- Verify the configuration of your
values.ymlso far. Ensurelicense-key,instance-admin-emailandinstance-admin-passwordare all available via Kubernetes Secrets (configured in prerequisites). It should appear as follows:
Sample initial values.yml file
global:
  edition: enterprise
  airbyteUrl: # e.g. https://airbyte.company.example
  auth:
    instanceAdmin:
      firstName: ## First name of admin user.
      lastName: ## Last name of admin user.
    identityProvider:
      type: oidc
      secretName: airbyte-config-secrets ## Name of your Kubernetes secret.
      oidc:
        domain: ## e.g. company.example
        app-name: ## e.g. airbyte
        clientIdSecretKey: client-id
        clientSecretSecretKey: client-secret
The following subsections help you customize your deployment to use an external database, log storage, dedicated ingress, and more. To skip this and deploy a minimal, local version of Self-Managed Enterprise, jump to Step 3.
Configuring the Airbyte Database
For Self-Managed Enterprise deployments, we recommend using a dedicated database instance for better reliability, and backups (such as AWS RDS or GCP Cloud SQL) instead of the default internal Postgres database (airbyte/db) that Airbyte spins up within the Kubernetes cluster.
We assume in the following that you've already configured a Postgres instance:
External database setup steps
Add external database details to your values.yaml file. This disables the default internal Postgres database (airbyte/db), and configures the external Postgres database. You can override all of the values below by setting them in the airbyte-config-secrets or set them directly here. You must set the database password in the airbyte-config-secrets. Here is an example configuration:
postgresql:
  enabled: false

global:
  database:
    # -- Secret name where database credentials are stored
    secretName: "" # e.g. "airbyte-config-secrets"

    # -- The database host
    host: ""
    # -- The key within `secretName` where host is stored
    #hostSecretKey: "" # e.g. "database-host"

    # -- The database port
    port: ""
    # -- The key within `secretName` where port is stored
    #portSecretKey: "" # e.g. "database-port"

    # -- The database name
    database: ""
    # -- The key within `secretName` where the database name is stored
    #databaseSecretKey: "" # e.g. "database-name"

    # -- The database user
    user: "" # -- The key within `secretName` where the user is stored
    #userSecretKey: "" # e.g. "database-user"

    # -- The key within `secretName` where password is stored
    passwordSecretKey: "" # e.g."database-password"
Configuring External Logging
For Self-Managed Enterprise deployments, we recommend spinning up standalone log storage for additional reliability using tools such as S3 and GCS instead of against using the default internal Minio storage (airbyte/minio). It's then a common practice to configure additional log forwarding from external log storage into your observability tool.
External log storage setup steps
Add external log storage details to your values.yaml file. This disables the default internal Minio instance (airbyte/minio), and configures the external log database:
- S3
- GCS
Ensure you've already created a Kubernetes secret containing both your S3 access key ID, and secret access key. By default, secrets are expected in the airbyte-config-secrets Kubernetes secret, under the aws-s3-access-key-id and aws-s3-secret-access-key keys. Steps to configure these are in the above prerequisites.
global:
  storage:
    type: "S3"
    storageSecretName: airbyte-config-secrets # Name of your Kubernetes secret.
    bucket: ## S3 bucket names that you've created. We recommend storing the following all in one bucket.
      log: airbyte-bucket
      state: airbyte-bucket
      workloadOutput: airbyte-bucket
    s3:
      region: "" ## e.g. us-east-1
      authenticationType: credentials ## Use "credentials" or "instanceProfile"
Set authenticationType to instanceProfile if the compute infrastructure running Airbyte has pre-existing permissions (e.g. IAM role) to read and write from the appropriate buckets.
Ensure you've already created a Kubernetes secret containing the credentials blob for the service account to be assumed by the cluster. By default, secrets are expected in the gcp-cred-secrets Kubernetes secret, under a gcp.json file. Steps to configure these are in the above prerequisites.
global:
  storage:
    type: "GCS"
    storageSecretName: gcp-cred-secrets
    bucket: ## GCS bucket names that you've created. We recommend storing the following all in one bucket.
      log: airbyte-bucket
      state: airbyte-bucket
      workloadOutput: airbyte-bucket
    gcs:
      projectId: <project-id>
      credentialsPath: /secrets/gcs-log-creds/gcp.json
Configuring External Connector Secret Management
Airbyte's default behavior is to store encrypted connector secrets on your cluster as Kubernetes secrets. You may optionally opt to instead store connector secrets in an external secret manager such as AWS Secrets Manager, Google Secrets Manager or Hashicorp Vault. Upon creating a new connector, secrets (e.g. OAuth tokens, database passwords) will be written to, then read from the configured secrets manager.
Configuring external connector secret management
Modifing the configuration of connector secret storage will cause all existing connectors to fail. You will need to recreate these connectors to ensure they are reading from the appropriate secret store.
- Amazon
- GCP
If authenticating with credentials, ensure you've already created a Kubernetes secret containing both your AWS Secrets Manager access key ID, and secret access key. By default, secrets are expected in the airbyte-config-secrets Kubernetes secret, under the aws-secret-manager-access-key-id and aws-secret-manager-secret-access-key keys. Steps to configure these are in the above prerequisites.
secretsManager:
  type: awsSecretManager
  awsSecretManager:
    region: <aws-region>
    authenticationType: credentials ## Use "credentials" or "instanceProfile"
    tags: ## Optional - You may add tags to new secrets created by Airbyte.
      - key: ## e.g. team
        value: ## e.g. deployments
      - key: business-unit
        value: engineering
    kms: ## Optional - ARN for KMS Decryption.
Set authenticationType to instanceProfile if the compute infrastructure running Airbyte has pre-existing permissions (e.g. IAM role) to read and write from AWS Secrets Manager.
To decrypt secrets in the secret manager with AWS KMS, configure the kms field, and ensure your Kubernetes cluster has pre-existing permissions to read and decrypt secrets.
Ensure you've already created a Kubernetes secret containing the credentials blob for the service account to be assumed by the cluster. By default, secrets are expected in the gcp-cred-secrets Kubernetes secret, under a gcp.json file. Steps to configure these are in the above prerequisites. For simplicity, we recommend provisioning a single service account with access to both GCS and GSM.
secretsManager:
  type: googleSecretManager
  storageSecretName: gcp-cred-secrets
  googleSecretManager:
    projectId: <project-id>
    credentialsSecretKey: gcp.json
Configuring Ingress
To access the Airbyte UI, you will need to manually attach an ingress configuration to your deployment. The following is a skimmed down definition of an ingress resource you could use for Self-Managed Enterprise:
Ingress configuration setup steps
- NGINX
- Amazon ALB
apiVersion: networking.k8s.io/v1
kind: Ingress
metadata:
  name: # ingress name, example: enterprise-demo
  annotations:
    ingress.kubernetes.io/ssl-redirect: "false"
spec:
  ingressClassName: nginx
  rules:
    - host: # host, example: enterprise-demo.airbyte.com
      http:
        paths:
          - backend:
              service:
                # format is ${RELEASE_NAME}-airbyte-webapp-svc
                name: airbyte-enterprise-airbyte-webapp-svc
                port:
                  number: 80 # service port, example: 8080
            path: /
            pathType: Prefix
          - backend:
              service:
                # format is ${RELEASE_NAME}-airbyte-keycloak-svc
                name: airbyte-enterprise-airbyte-keycloak-svc
                port:
                  number: 8180
            path: /auth
            pathType: Prefix
          - backend:
              service:
                # format is ${RELEASE_NAME}-airbyte--server-svc
                name: airbyte-enterprise-airbyte-server-svc
                port:
                  number: 8001
            path: /api/public
            pathType: Prefix
If you are intending on using Amazon Application Load Balancer (ALB) for ingress, this ingress definition will be close to what's needed to get up and running:
apiVersion: networking.k8s.io/v1
kind: Ingress
metadata:
  name: # ingress name, e.g. enterprise-demo
  annotations:
    # Specifies that the Ingress should use an AWS ALB.
    kubernetes.io/ingress.class: "alb"
    # Redirects HTTP traffic to HTTPS.
    ingress.kubernetes.io/ssl-redirect: "true"
    # Creates an internal ALB, which is only accessible within your VPC or through a VPN.
    alb.ingress.kubernetes.io/scheme: internal
    # Specifies the ARN of the SSL certificate managed by AWS ACM, essential for HTTPS.
    alb.ingress.kubernetes.io/certificate-arn: arn:aws:acm:us-east-x:xxxxxxxxx:certificate/xxxxxxxxx-xxxxx-xxxx-xxxx-xxxxxxxxxxx
    # Sets the idle timeout value for the ALB.
    alb.ingress.kubernetes.io/load-balancer-attributes: idle_timeout.timeout_seconds=30
    # [If Applicable] Specifies the VPC subnets and security groups for the ALB
    # alb.ingress.kubernetes.io/subnets: '' e.g. 'subnet-12345, subnet-67890'
    # alb.ingress.kubernetes.io/security-groups: <SECURITY_GROUP>
spec:
  rules:
    - host: # e.g. enterprise-demo.airbyte.com
      http:
        paths:
          - backend:
              service:
                name: airbyte-enterprise-airbyte-webapp-svc
                port:
                  number: 80
            path: /
            pathType: Prefix
          - backend:
              service:
                name: airbyte-enterprise-airbyte-keycloak-svc
                port:
                  number: 8180
            path: /auth
            pathType: Prefix
          - backend:
              service:
                # format is ${RELEASE_NAME}-airbyte-server-svc
                name: airbyte-enterprise-airbyte-server-svc
                port:
                  number: 8001
            path: /api/public
            pathType: Prefix
The ALB controller will use a ServiceAccount that requires the following IAM policy to be attached.
Once this is complete, ensure that the value of the webapp-url field in your values.yaml is configured to match the ingress URL.
You may configure ingress using a load balancer or an API Gateway. We do not currently support most service meshes (such as Istio). If you are having networking issues after fully deploying Airbyte, please verify that firewalls or lacking permissions are not interfering with pod-pod communication. Please also verify that deployed pods have the right permissions to make requests to your external database.
Step 3: Deploy Self-Managed Enterprise
Install Airbyte Self-Managed Enterprise on helm using the following command:
helm install \
--namespace airbyte \
--values ./values.yaml \
airbyte-enterprise \
airbyte/airbyte
To uninstall Self-Managed Enterprise, run helm uninstall airbyte-enterprise.
Updating Self-Managed Enterprise
Upgrade Airbyte Self-Managed Enterprise by:
- Running
helm repo update. This pulls an up-to-date version of our helm charts, which is tied to a version of the Airbyte platform. - Re-installing Airbyte Self-Managed Enterprise:
helm upgrade \
--namespace airbyte \
--values ./values.yaml \
--install airbyte-enterprise \
airbyte/airbyte
Customizing your Deployment
In order to customize your deployment, you need to create an additional values.yaml file in your airbyte directory, and populate it with configuration override values. A thorough values.yaml example including many configurations can be located in charts/airbyte folder of the Airbyte repository.
After specifying your own configuration, run the following command:
helm upgrade \
--namespace airbyte \
--values ./values.yaml \
--install airbyte-enterprise \
airbyte/airbyte
Customizing your Service Account
You may choose to use your own service account instead of the Airbyte default, airbyte-sa. This may allow for better audit trails and resource management specific to your organizational policies and requirements.
To do this, add the following to your values.yaml:
serviceAccount:
  name:
AWS Policies Appendix
Ensure your access key is tied to an IAM user or you are using a Role with the following policies.
AWS S3 Policy
The following policies, allow the cluster to communicate with S3 storage
{
  "Version": "2012-10-17",
  "Statement":
    [
      { "Effect": "Allow", "Action": "s3:ListAllMyBuckets", "Resource": "*" },
      {
        "Effect": "Allow",
        "Action": ["s3:ListBucket", "s3:GetBucketLocation"],
        "Resource": "arn:aws:s3:::YOUR-S3-BUCKET-NAME",
      },
      {
        "Effect": "Allow",
        "Action":
          [
            "s3:PutObject",
            "s3:PutObjectAcl",
            "s3:GetObject",
            "s3:GetObjectAcl",
            "s3:DeleteObject",
          ],
        "Resource": "arn:aws:s3:::YOUR-S3-BUCKET-NAME/*",
      },
    ],
}
AWS Secret Manager Policy
{
    "Version": "2012-10-17",
    "Statement": [
        {
            "Effect": "Allow",
            "Action": [
                "secretsmanager:GetSecretValue",
                "secretsmanager:CreateSecret",
                "secretsmanager:ListSecrets",
                "secretsmanager:DescribeSecret",
                "secretsmanager:TagResource",
                "secretsmanager:UpdateSecret"
            ],
            "Resource": [
                "*"
            ],
            "Condition": {
                "ForAllValues:StringEquals": {
                    "secretsmanager:ResourceTag/AirbyteManaged": "true"
                }
            }
        }
    ]
}